Setting up a custom domain for your online store is one of your most important decisions. It’s the foundation for your brand, and this is how your customers will remember you. A typical Reetail store is hosted on a .reetail.store subdomain, which isn’t exactly pretty. Attaching a custom domain will let you add your own domain name.
1. Buy a new domain
The first step is to buy a domain. We recommend NameCheap. The set up is easy and the prices are reasonable.
Tip – Instead of looking for a .com, try looking for a .shop or .store which are typically much cheaper.
2. Add your custom domain in Reetail
Once you have a domain, you can add it to Reetail. You will be given the DNS records to update. In rare cases, you might be asked to further verify that you own the domain with TXT record verification.
To get started:
- Log into your Reetail dashboard
- Go to Settings > Custom Domain
- Click “Add”. If the DNS records are correct, the domain should show a connected status, otherwise it will tell you the records that need to be added.

Reetail Custom Domain screen
Update the DNS records based on the instructions presented.
3. Update your DNS
DNS records tell your domain provider where to send people when they type your domain name in the browser. In our case, we want to send people to your Reetail store.
Follow these steps to add your DNS records depending your domain provider:
Namecheap
To add a CNAME record to your Namecheap DNS configuration, follow these steps:
- Go to the Namecheap website and sign in to your account.
- Click on the “Dashboard” button in the top right corner.
- In the “Domains” tab, click on the domain for which you want to add a CNAME record.
- Click on the “Manage” button.
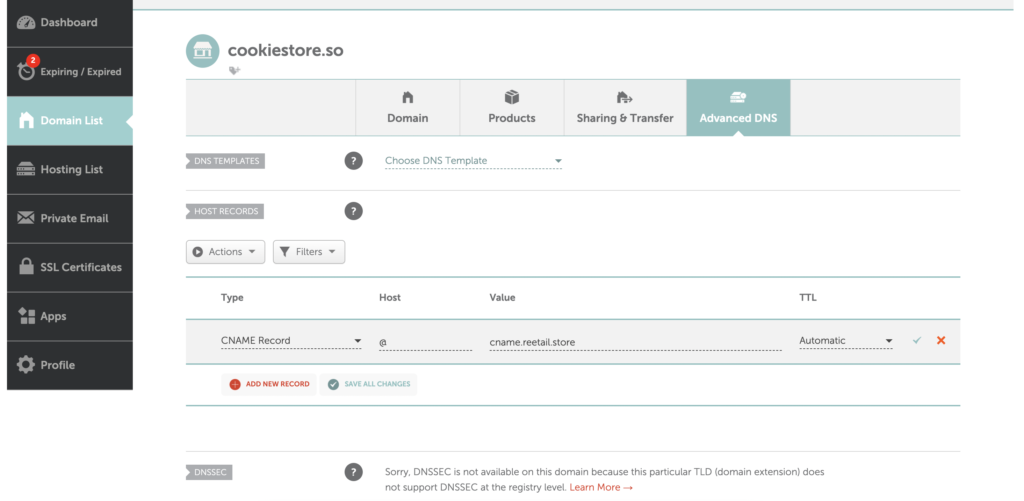
- Scroll down to the “Advanced DNS” section and click on the “Add New Record” button.
- In the “Type” dropdown menu, select “CNAME”.
- In the “Host” field, enter the subdomain you want to use.
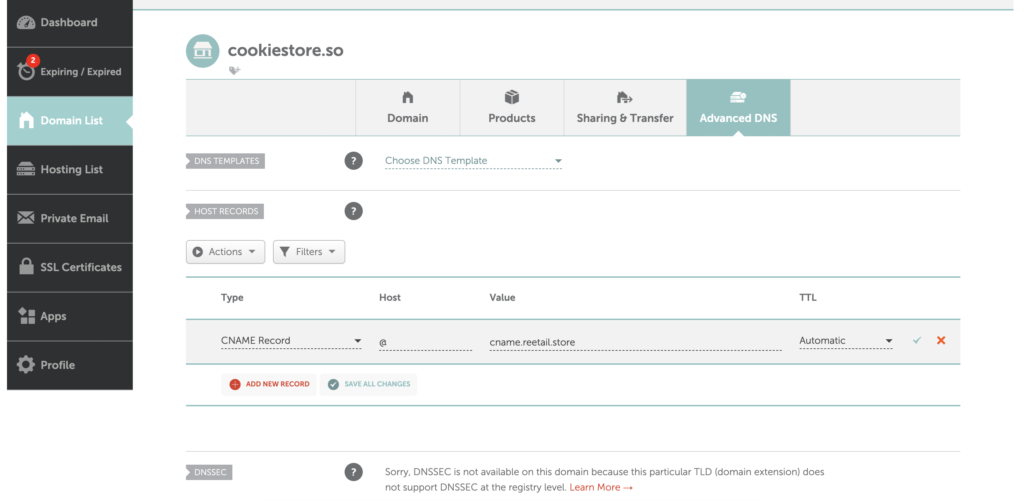
- To use the root domain like “cookiestore.com“, use “@” (without the quotes).
- To use a subdomain like: “shop.cookiestore.com“, use the first part, “shop” as the value.
- In the “Value” field, enter “cname.reetail.store” (without the quotes).
- Click the “Save All Changes” button to add the CNAME record.

Namecheap DNS records for Reetail store
It may take some time for the changes to take effect, as DNS updates can take up to 48 hours to propagate.
GoDaddy
To add a CNAME record to your GoDaddy DNS configuration, follow these steps:
- Sign in to your GoDaddy Domain Portfolio.
- Go to the domain you would like to add and navigate to “Domain Edit Options” > “Edit DNS”.
- Select “Add” to add a new record.
- In the “Type” dropdown menu, select “CNAME”.
- In the “Name” field, enter:
- To use the root domain like “cookiestore.com“, use “@” (without the quotes).
- To use a subdomain like: “shop.cookiestore.com“, use the first part, “shop” as the value.
- In the “Value” field, enter “cname.reetail.store” (without the quotes).
- Leave the “TTL” field empty.
- Click the “Save” button to add the CNAME record.
It may take some time for the changes to take effect, as DNS updates can take up to 48 hours to propagate.
1&1 Ionos
To add a CNAME record to your 1&1 Ionos DNS configuration, follow these steps:
- Go to the 1&1 Ionos website and sign in to your account.
- Click on the “Domains” tab.
- Click on the domain for which you want to add a CNAME record.
- Click on the “DNS” tab.
- Scroll down to the “CNAME Records” section.
- Click the “Add” button.
- In the “Hostname” field, enter:
- To use the root domain like “cookiestore.com“, use “@” (without the quotes).
- To use a subdomain like: “shop.cookiestore.com“, use the first part, “shop” as the value.
- In the “Destination” field, enter “cname.reetail.store” (without the quotes).
- Click the “Save” button to add the CNAME record.
It may take some time for the changes to take effect, as DNS updates can take up to 48 hours to propagate.
HostGator
To add a CNAME record to your HostGator DNS configuration, follow these steps:
- Go to the HostGator website and sign in to your account.
- Click on the “My Account” tab.
- Scroll down to the “Domains” section and click on the domain for which you want to add a CNAME record.
- Click on the “Advanced DNS Zone Editor” tab. Scroll down to the “Add a Record” section.
- In the “Type” dropdown menu, select “CNAME”.
- In the “Name” field, enter:
- To use the root domain like “cookiestore.com“, use “@” (without the quotes).
- To use a subdomain like: “shop.cookiestore.com“, use the first part, “shop” as the value.
- In the “Address” field, enter “cname.reetail.store” (without the quotes).
- In the “TTL” field, you can specify how long the DNS server should cache the record before requesting updated information. You can leave this field at the default value or specify a different time in seconds.
- Click the “Add Record” button to add the CNAME record.
It may take some time for the changes to take effect, as DNS updates can take up to 48 hours to propagate.
4. Test your configuration
You can use a tool like MX Toolbox to verify that the DNS changes have indeed propagated over.
Here’s what my domain looks like once it’s configured:

Test custom domain configuration
5. Finish Connecting
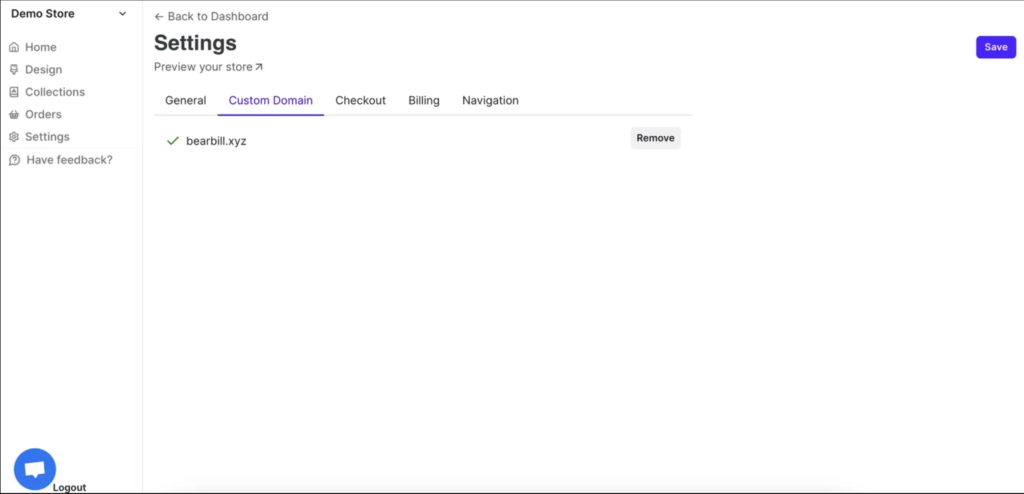
Once you added the records, go back to Reetail settings and hit “Add” button again until you see a success screen like below.

Successfully connected custom domain on Reetail
Congratulations! Now you can access your store in your custom domain!
FAQ
- Domain is not connecting.Make sure that that domain name in Reetail settings exactly matches the domain name that you set the CNAME for in the DNS. A domain with www, like www.cookiestore.com is considered different from cookiestore.com. Make sure either both are www or neither are.